Showing posts with label Halloween. Show all posts

Friday, September 25, 2015

How to weigh down foam pumpkins

Our family lives east of Seattle in the foothills of the Cascade Mountains. Between the beautiful mountain views and the wildlife, we absolutely love living here.
 
But there is one thing about living here that can cause a few problems. In fall and winter we get super strong winds. We have to secure anything and everything outside unless we want it to show up two blocks away after a storm.
 
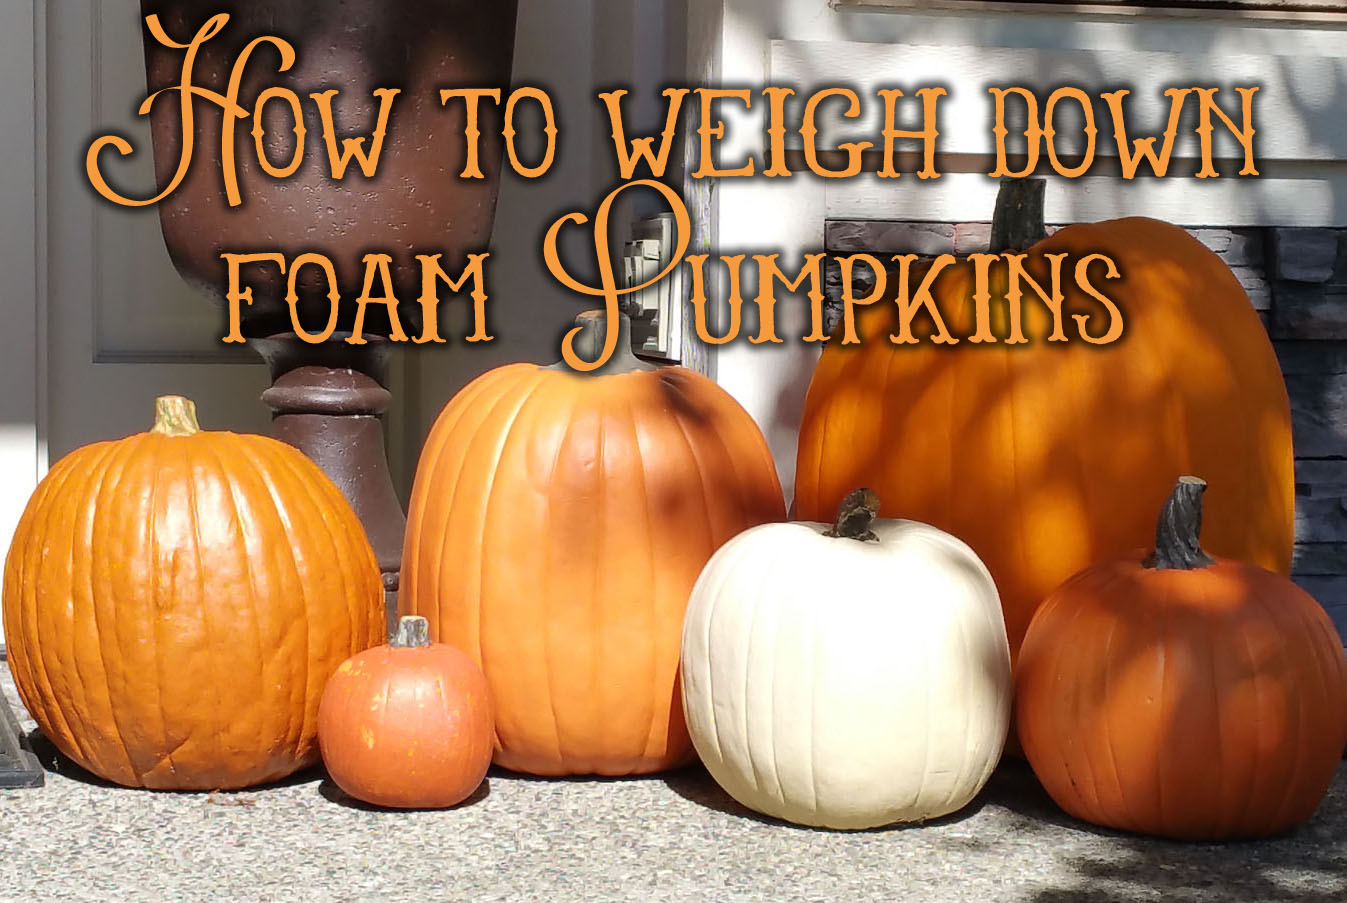
That means securing any decorations that we have up for the current holiday. Right now, that means weighing down the foam pumpkins that we have on our front porch.
 
I played around with a few different methods before I came up with the one below. This only works with foam pumpkins that are uncarved. I'm still working on a foolproof method for carved foam pumpkins.
 
 
Here are the tools you'll need to weigh down your uncarved foam pumpkins:
  • drill - I use a Porter Cable PC1800D that was a Consumer Reports best buy at the time. I highly recommend Porter Cable drills and it looks like this one is the comparable version available today. You definitely want to get the two battery model so you can charge one battery while using another.
  • 2"+ hole saw drill bit (the ones I use are a bit older and are orange)
  • piece of paper or a funnel
  • heavy duty large plastic bags - I used lawn and leaf bags from Costco (for large pumpkins) or gallon sized freezer bags (for smaller pumpkins)
  • heavy duty craft scissors
  • fine sand - I used paving sand
Make sure that you work outside in a well ventilated area. This produces a lot of dust!
 
First, turn your foam pumpkin over on your lap (protect the stem!). If your pumpkin already has a hole at the bottom, you can skip this step. Use the drill to drill a hole into the bottom of your pumpkin.  NOTE: this is a lot harder said than done and it produces a lot of dust. I recommend easing up on the choke so you're not going at it full throttle. It cuts much easier that way.
 
 
This will get foam dust everywhere! I had to shake my pants out when I was finished.
 
Then take your plastic bag and stuff it into the pumpkin with the open end facing out.
 
 
Next, take your funnel or piece of paper and roll it up to fit in the hole. I used a large cup to slowly pour the sand in. Make sure that you go slowly! This produces a lot of dust, and if you go too fast you'll plug up your funnel.
 
 
Every few cup fulls, I'll pick up the pumpkin and feel how heavy it is. My goal is to make it as heavy as an actual pumpkin.
 
When you've got it as heavy as you'd like, get as much air out of the plastic bag as you can and twist up the rest of the bag like this:
 
 
Now knot it at least twice, and as close to the sand as possible. You want it super secure so that no sand leaks out. Then cut off the excess bag with your scissors and tuck the knotted part in. I like to also push the knot to one side so that it's not always coming out when you pick up the pumpkin.
If you're using a gallon sized freezer bag for smaller pumpkins, just seal up bag tightly and tuck the end in.
 
 
Turn the pumpkin over and put it wherever you like. And make sure that you never ever pick up your pumpkin by the stem! If you do have a stem break off, this glue works best to secure it back on.
 
You now have a weighted pumpkin that you can use year after year and won't blow off your porch during a storm.
 

Happy decorating!

Wednesday, August 4, 2010

organizing family photos and albums

Most people who read my blog know that I love to take pictures.  A lot of pictures. And I also like to scrapbook and create Life Art, its a great creative outlet for me and I love looking back on all of our memories.

I've gotten a lot of questions from people asking how I organize everything and I am finally explaining everything from albums to photos.

We have two ikea bookshelves in our living room that hold all of our books,


I like having them out in the open in a central location.

At this point in our lives, I have the albums divided into four categories: Roman, Family, Christmas and Week In The Life (still on volume 1 of that one, I just started last year).  I also have any mini-books that I've done in a basket below the albums (you can see the top of it in the top photo).

Because these books span eleven years, I also have some specialty albums, our wedding, my family history, Zach's family history, my high school & college memories, Roman's first year and yes, I even have smaller albums for the pets (keep in mind that we had the pets before Roman came along so I had some extra time on my hands).  You can also see that I've used several different types of albums over the years, the one thing that keeps everything "together" is the labeling system that I use on the spines.

I see a lot of software out there to help organize photos and to me it looks like it takes something that can be simple and makes it complicated (and I loathe complicated).

I organize my pictures like I organize my albums, we have a "media" folder with subfolders of "Christmas Album", "Family Album", "Roman's Album" and "Other Albums".

The Christmas Album folder has subfolders with the years the photos were taken (with a Christmas Past folder for random scanned pictures when I was a kid).  I didn't go digital until 2005 so thats when the folders start,


Our Family Album photos are organized the same way,

and Roman's photos are organized by his age,
The Other Albums folder is for projects like Week In The Life, December Daily, etc.

Then when I download my pictures from my computer, I make a folder for each event (Roman's Birthday, a fun Saturday outing, etc.) and then put the photos in the corresponding folder.

Last year I decided to try a December Daily album, something new and really fun, but I found that I was repeating a lot of the same things in our Christmas family album.  So this year, I knew that I wanted to do something similar to the December Daily...just not in December.

My favorite month is and always has been October.  I love everything about it, from the leaves changing, the pumpkins, the super fun Halloween decorations and the cooler temperatures.  And every year, it seems to go by way too fast.  So this year, in December Daily tradition, I'm going to be doing an Everyday October album - something that I am really, really excited about.

So that's it - my super simple, non-complicated system. If you have a user-friendly system I'd love to hear about it!

Thursday, October 22, 2009

the pumpkins have landed

and I am having so much fun with them this year! I've been thinking of using gourds for noses, ears, etc. for years and I finally did it this year. I actually used our electric drill to drill the hole. I wasn't prepared for the pumpkin goo to splatter all over the kitchen, but when you use power tools, it can get messy. And it did. Big time.

I also wanted to try a fun new idea that I saw on MarthaStewart.com. This technique uses wood gouges to carve into the pumpkin's skin without going all the way through. The result is pretty darn cool. So first I measured my pumpkin, then made a template on my computer, printed it out and taped it to the pumpkin. Then I used an awl to poke holes around the letters so I could see them when I took the paper off. Then came the wood gouges! Here you can not only see the pumpkin but a close up of my super thick glasses. Yes, it is a wonder that I can see at all. Here is the finished design: Roman wanted a scary pumpkin so we made this one for him: Happy Carving!!

Monday, October 19, 2009

lanterns are finished

and I am very happy with them! They are a bit smaller then what Martha has on her website because I used my wishblade to cut the parts out (did not want to do it all by hand!). I purchased the orange vellum on eBay and I used Bazzill Bling Black Tie Cardstock from scrapbook.com to make the lanterns themselves. Add beeswax votives inside and you have a frightfully beautiful display for Halloween!

Tuesday, September 29, 2009

halloween is a'coming...

and I am so excited! I love everything about it - the colors, pumpkins, decorating, everything. I have also been crafting like crazy lately and wanted to show you whats been going on at my house.

My favorite magazine of all time is Creating Keepsakes. Absolutely love it for inspiration and ideas. I've also been really into getting past issues from eBay, in fact, I have every single issue from 2004 to the present. This is above my computer desk so I can easily grab an issue when inspiration strikes. And you never know when you're going to find an especially amazing issue.
Isn't this cool? This is a project from the October 2008 issue of Creating Keepsakes. The article is called "Halloween Countdown" by Candice Stringham and includes two projects, this 13 days of Halloween project and the crow banner that you'll see later on.

The frame is from Ikea and I just got the wire mesh from our local hardware store. I made the little creations from miscellaneous embellishments and fun scrapbook paper. Then I used hooks (from "hook and eye" sets) from JoAnn Fabrics, and fixed them to the back of my various creations.

You can see that they are numbered 1-13, on the back of each item (or inside the item itself) is something to do on that particular day, like "try on your costume" or "bake Halloween cookies". For the crow banner, I redrew the crow image in Adobe Illustrator then cut out the crows with my Wishblade (I was lazy and didn't want to cut them all out by hand). I also cut the letters out with the Wishblade as well. Now the crow banner in the magazine said "spooky" but I liked "Halloween" better.

I also wanted a banner for the upstairs fireplace, so I made one of my own design,
The last project I've been working on is a luminary from MarthaStewart.com. I wanted to do something special on the piano this year.
It turned out pretty cool, I hope to make two more to go on either side and add some pumpkins on there. I'll take pictures when I'm finished with the whole setup.

I am having an absolutely blast with all of this - it is so much fun seeing something and then recreating it with my own twist on it. I would love to see what you're working on this year, leave me a comment!